Tuesday, December 31, 2013

Chocolate Frosting

Happy New Year's Eve!
I am trying something new today - posting from my iPad.  So, if anything looks weird, it's not intentional!  We'll see how this goes.

I have written before on the favorite chocolate cake around here.  It's on every Hershey's Cocoa container - Perfectly Chocolate Cake.   The Perfectly Chocolate Frosting that goes with it is the best chocolate frosting ever!  I had been having a little trouble with the frosting being smooth, due to the way the ingredients are added, but I have played with it and gotten a frosting that I get rather excited about!   Since the butter and cocoa mixture are warm from melting the butter, when I would add the milk, the chocolate would cool and there would be thicker bits of cocoa throughout the frosting.  What I have started doing is making the frosting in the pan that I melt the butter in.   This way there is not any drastic change in temperature and rapid cooling.  (Note: turn the burner off)  I add part of the powdered sugar first, mix it really well with the hand mixer, then add a small amount of the milk.  At this point it looks like it is never going to be smooth, but it gets the sugar and cocoa mixture evenly incorporated so that there are not any clumps of chocolate.  Then repeat with the rest of the powdered sugar and milk.  I just keep mixing and using a spatula to move the icing from the sides of the pan.  I do this for much longer than seems necessary, and add a little more milk if it seems a little too thick.  It becomes this beautiful smooth velvety frosting.  A key thing is to not get caught up in the excitement of the pretty frosting and forget to add the vanilla at the end.  This has happened to me and I was the only one that noticed, but it tastes much better with vanilla.  And, it will keep you from wondering why the cake tasted different this time, and waking up in the middle of the night saying - of course it was different, I forgot the vanilla in the frosting!   A few times I was afraid to add more milk and then regretted it because the frosting was a little harder to spread.  Plus, sprinkles stick a lot better to a moister frosting.

I purchased a Wilton Cake Caddy with the turntable base - this makes all the difference in frosting a round cake!  I can focus on the frosting, not the rotating of the cake.   This also stores the cake very well, which always seems to be a problem with layer cakes - airtight, no smashing the icing....

I had bought the disposable 9x13 cake pans so I could easily take a cake to an dinner and not worry about how I was going to transport it and deal with a pan/platter.  I love making the cakes in these pans!  Since it's not a layer cake and due to the shape of the pans, the cake is a little more dense and so moist!  The clear plastic lids are great too!  

These are not new inventions, but things I just started using and am quite happy with!

Below are a bunch of cakes I have made over the past year.  I guess I didn't take a picture of the first one I made in the disposable pan; it was so beautiful and just pretty icing, not overloaded with sprinkles.  Not that you can have too many sprinkles, but the icing was beautiful.

Now I need to go make one of these cakes to frost with white icing for our New Year's Eve dinner. :-)


Monday, December 30, 2013

Peanut Butter Cookies - Plain, Kisses & Turkeys

I am sitting here, on the last cold Monday morning of 2013, enjoying the fireplace and the Christmas tree.  Even though I love the Christmas lights and decorations, I am ready for them to come down and move forward.   I cannot believe the year is over and am shocked that I have done so little blogging - I even missed by blog-iversary.   I have so many things that I have wanted to write about, I just haven't gotten to it.  I am the typical perfectionist - handicapped by wanting things to be just right.   But I see that if I wait until I have the time to do my blog and re-check it 50 times before posting, it will never get done.  As my two loyal readers have urged me to just do it and not worry about it being perfect.....I will try!  I am not one for New Year's Resolutions, but that will be mine this year!

I guess I will start with a new favorite cookie.  Just before Thanksgiving, I found a recipe for peanut butter cup turkey cookies on Bake at 350.  They are so adorable, I had to make them!  The cookie is great and decorating them to look like turkeys was a lot of fun.  I made them for Little C and her friend.  They put the peanut butter cups and eyes on the turkeys.  The white chocolate chips were a little difficult to stick in to the peanut butter cups, but we managed, without too many mangled turkey faces.

You start with a large peanut butter cookie and attach a small peanut butter cup with melted chocolate for the body.  White chocolate chips with melted chocolate make the eyes.  Then colored peanut butter frosting is used for the beak, feet and feathers.  Now, I hate to admit this because it is quite ridiculous, but in my state of trying to do too much in one day, I got a little confused when I was decorating.  Of course I didn't slow down to look at the recipe picture, and even though it didn't seem right, I put the beak where the feet were supposed to be.  Ugh!  Once I realized it, it was a slightly easy fix.  The girls didn't notice, so it was ok.  What's a little confusion about Turkey anatomy whey there is a cookie loaded with frosting and candy!?!?  They were still super cute!

The recipe makes a lot of cookies and I didn't decorate all of them.  The plain cookies are great too and freeze well.  When Mr. SBQ tasted them, he said they would be a good cookie base for Peanut Blossoms.  Perfect!  Last year I made the recipe off the Hershey Kisses bag and wasn't thrilled with how they turned out.   I made the Peanut Blossoms on Christmas Eve, using this recipe and they were wonderful.  Yay!

For the turkey cookies, I used a larger cookie scoop, and for the kiss cookies, I used the small cookie scoop.  I made the balls of dough, rolled them in sugar, baked for about 10 minutes, pressed the kisses in to each cookie and placed on the cooling rack.  One thing about these cookies, they don't need to bake as long as it seems.  I usually flip one cookie over while they are still in the oven - if it is getting golden on the bottom, I take them out no matter what the tops look like.  I usually let them cool on the pan for about 5 minutes.  These I just left on the pan until we had all the kisses in place.

Here is the basic cookie recipe slightly adapted from Imperial Sugar. (the link will take you to the full recipe for the turkey cookies)

Peanut Butter Cookies
3 cups unbleached, all-purpose flour
2 teaspoons baking soda
Dash of sea salt
1 cup unsalted butter
1 cup granulated sugar
1 cup light brown sugar
2 eggs
2 teaspoons vanilla extract
1 cup smooth peanut butter


Preheat oven to 350.  Line cookie sheets with parchment paper.
In a medium bowl, whisk the flour, baking soda and salt together.  Set aside.
In a large bowl of an electric mixer, cream the butter and sugars together until light and fluffy.  Beat in the eggs and vanilla until combined.  Add in the peanut butter and mix until smooth.
Stir in the flour mixture.
Scoop the dough onto the prepared sheets (2T/large scoop for large cookies - bake about 13 minutes; Small scoop for peanut blossom cookies- bake about 10 minutes).  For the turkey cookies or just a large cookie, flatten slightly - I use a ramekin dipped in sugar.  For the smaller cookies, there is no need to flatten.
Bake until the cookies are golden and baked through. 

The Perfect Peanut Blossom Cookie

Turkey Peanut Butter Cup Cookies


Saturday, September 28, 2013

Fall Wreath - Deco Mesh

So I have loved the idea of deco mesh for the last year or so, but couldn't figure out the loopy wreath look.   Since I like to figure things out and do them my own way, that handicaps me sometimes.  Last year I had almost everything for a Christmas wreath, but I started too late and the wire frames were sold out everywhere.  I ended up ordering one for 3x's the price.  I looked at some blogs/tutorials on deco mesh wreaths, but kept getting frustrated and it was almost Christmas, so I just put everything away.

I have the pumpkin/scarecrow wreath from last year on the front door, but we had painted the house this year and I wanted to put something pretty on the side garage door.  This area can be seen from the kitchen and it will be seen by more people.   I didn't really have a plan like I normally do; I was just going to Hobby Lobby to find some things to make a wreath out of.   I saw this deco mesh and really liked it.  I put it in the cart and in the back of my head was thinking - oh no, here we go again; what am I going to do with this!?!  I grabbed another wire wreath frame because, even though I had one at home that is still only sporting on measly red ribbon, these things sell out fast and I didn't want to miss out.   I got a roll of the orange burlap ribbon and a bunch of random Fall floral bits.  Still had no real plan, but I figured I had all the materials and I would come up with something.

I searched for instructions and found a YouTube video showing how to do an easy deco mesh wreath.  Ah, pipe cleaners are part of the secret!  I was using floral wire, which would work, but isn't as easy.   I had no idea that many of these wreaths use the large deco mesh for the base color.  Oh well, I had 2 rolls of the 5" so that would have to do.   Of course I watched the video and noted the main items, but disregarded the rest - I want to be creative and original! (and drive myself crazy)  I attached the pipe cleaners, which we thankfully had a ton of from a Mother's Day craft Mr. SBQ and Little C did one year.   I cut them in half, twisted/attached at each cross bar and then others in between on the top 2 frame wires.  I started looping and bunching the mesh.  I did three loops and then where they were bunched at the base, attached them to the frame with the pipe cleaner.  It really does help to attach the pipe cleaners to the frame first, so you can concentrate on the mesh.  I had thought that you needed to cut each section, but you don't.  I made it the 85% of the way around and ran out of mesh.  No!  Really?  I bought 2 rolls to avoid this.  I was on a roll (ha!) and had some time before the Little C got home, so I raced to Hobby Lobby and got another roll of deco mesh.  Thankfully they still had the same kind.

I was on my creativity high and didn't want to waste a trip to Hobby Lobby, so I got some supplies for another Christmas wreath.  After my education, I bought the wide deco mesh - 2 rolls, even though 1 should be enough.   My creativity wheels were turning and I realized that now that I know how to do this, I should do a giant wreath for above the fireplace.   I hit the wire wreath form display and bought the biggest one they had!  It's huge, I may need two more rolls of deco mesh!  I have the mesh and ribbon from last year for the accents and can figure out any other embellishments later.  Now, it didn't really occur to me that I was going to use all this for my mega wreath and still have the original over-priced frame in the closet.  I will have to make yet another trip to get more deco mesh for that one!

Now, back to the Fall wreath.  I came home and finished the deco mesh.  Then I wove in the orange burlap ribbon - I had to attach more pipe cleaners as I had used all the others for the mesh loops.  (The video I watched said to use the ones on the cross bars for the main color which was gathered, not looped; and to use the other ones for the accent.)   I was pretty happy with how it looked as I was tucking pipe cleaners in and puffing loops.  Then I looked at all the floral things I had and wasn't really sure what I was going to do with them.   I gathered everything together and attached it in the center, with several full size pipe cleaners.  This turned out really well and worked better than trying to tuck and secure them around the wreath.

I cut and hot glued felt to the back of the wreath hanger so it didn't scratch the paint.
Yay!  My first deco mesh wreath.

Fall Wreath

Fall Wreath Center

2013 Calendar

This is the calendar that I made for my mom.  I figured I should blog about it now, since it is almost time to do the next one.

She always keeps a calendar on the kitchen counter to write appointments and her bike miles on.   I wanted to make her something a little nicer than the advertisement/free/plain calendars she usually uses.  I made the grid for each month, had them printed at Kinkos, and then added the months/days/date.  I used papers that represented things she liked such as birds, bicycles, flowers, colors.   I did not use regular adhesive as I was afraid it would not hold up to the wear.  I used Scor-Tape which is my favorite adhesive because you can tear off the size piece you need.

I was nervous about her reaction and if it would fit the bill.  She loves it!  The back side of each page does not have a calendar on it, so additional notes and information can be written there.  The next one will have a little bit bigger squares for the days.   

I have already started getting the papers for the 2014 calendar and just  need to figure out how I am going to do each month grid.  

This makes a great gift, and aside from the planning and writing in the days, doesn't take too long to put together.  You can also buy pre-printed calendar pages, but to me that is like cake mix, and I like to make my own. :)
2013 Calendar Cover

2013 Calendar - January

2013 Calendar - February


2013 Calendar - March

2013 Calendar - April

2013 Calendar - May

2013 Calendar - June

2013 Calendar - July

2013 Calendar - August

2013 Calendar - September

2013 Calendar - October

2013 Calendar - November

2013 Calendar - December

Thursday, August 1, 2013

Chocolate Mint Fudge Bites

Chocolate and mint are one of my favorite combinations.   Mr. SBQ showed me this recipe in March, as it was in an article about green desserts.  These are good, but a little too complicated to make.  My cookie crust layer was not as thick as the recipe picture (I used regular Oreos).  And then the chocolate layer was not enough to cover the mint layer, which was moving all over the place, so it got a little frustrating.  Once I fought with the chocolate layer to get it to cover the mint enough, I understood why the sprinkles were needed - not a very pretty sight!  I also had to do a little marbling in the thin chocolate areas.  If there is a next time I will let the mint layer set up a little before I add the chocolate layer; and maybe increase the amount of chocolate.  Don't get me wrong, they taste great, they just did not go together as easily as I had hoped.


Chocolate Mint Fudge Bites

Wednesday, July 17, 2013

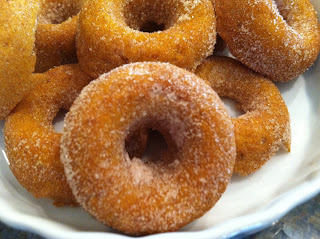
Doughnuts! Chocolate, Pumpkin Spice, and French Breakfast

My latest obsession has to do with something I almost never touch..........Doughnuts!

I believe it started with the baked pumpkin doughnuts I saw on Pinterest.  They intrigued me, so I saved the recipe.  This lead to me discovering King Arthur Flour's website and purchasing doughnut pans.  I was at a craft store one day, looking at what I thought was the clearance shelf, and came across a mini doughnut pan.  It didn't have a price, so I found a sales clerk and asked.  She informed me that no, that wasn't the clearance shelf, that is where the items with no home go.  However, I had my 40% off coupon so it might as well be a clearance item.  At that point I was picturing cute little doughnuts to amaze and delight Little C with, so I had to buy it!  (This sounds a lot like the mini muffin pan from last year; will I ever learn!?!?)

I decided to start with the recipe on the back of the mini doughnut pan.  Let me just say that mini doughnut pan is a pain!  Such tiny wells and the batter is thick, so it's not like it runs in to place.  However, I was determined.   They were ok; Little C and Mr. SBQ liked them - I think they were just being nice.  The recipe made something like 48 mini doughnuts and this pan holds 12!  I made 2 or 3 pans and threw out the rest of the batter.  There was nothing special about the flavor.  The first batch was dry because I baked them 6 minutes; the 2 was better baked for 4 minutes.  I tossed them in cinnamon and sugar while they were still warm - this way the sugar sticks.  The first pan was cool when I tried to coat them with the sugar mixture and it didn't really stick.  Warning about the mini pan - it is deceiving how many doughnuts you eat.  I am not putting in a link to this recipe because I didn't like it - it's on the Wilton pan.


Trial number 2.  I figured I would try the pumpkin doughnuts, and if I liked them, I would buy the regular doughnut pans.  I made 1 pan of mini doughnuts and the rest I made as muffins.  Oh wow!  Totally different experience with this recipe!  Flavor and texture are awesome!  The mini pan is still tedious, but I was learning how to deal with it.  I used 2 teaspoons to spoon a very small amount of batter on each side and then smooth them together.   The muffins are great if you don't want to mess with a doughnut pan.  These freeze well too!  I tossed these in a cinnamon and sugar mixture also.  I just put a cup of sugar and some cinnamon in a plastic food storage bag and toss a doughnut or two at a time to coat.   One note on these; the amount of canned pumpkin is almost a full can.

Now I HAD to have the doughnut pan!  And, why get one, when most recipes make 12 doughnuts?  I ordered mine from King Arthur Flour (they have coupons); they are Norpro and are about the same price on Amazon.  

The pans arrived (very nicely packaged) and I was super excited to try them.  My sister-in-law and her kids were here, so I decided I would surprise them with doughnuts for breakfast.  I wanted to try a chocolate doughnut recipe, but somehow had run out of brown sugar and that is the only sugar the recipe called for.  So, I decided to make my French Breakfast Puff recipe as doughnuts instead of muffins.    Since this was an experiment, I made 6 doughnuts and the rest as muffins.  They turned out great.  These are the ones that are dipped in melted butter and then tossed in cinnamon and sugar - even better as doughnuts!  There were 5 kiddos at breakfast that day, so there were not any leftovers!

The obsession continues.........I replenished the brown sugar and had the chocolate doughnuts on the brain.  So, this morning at 5:30 I was whipping up my 4th batch of doughnuts in about as many weeks.    
These should be called dessert doughnuts and I am slightly ashamed that I fed one to my child for breakfast even though it was balanced out with milk, Greek yogurt and a banana.  They are incredible!  Cocoa powder, espresso powder, chocolate chips...........see why I couldn't stop thinking about them!?!   I didn't even make the frosting that it calls for - I just coated them in granulated sugar.    I was able to get 12 standard and 12 mini doughnuts out of one batch.  I used my small cookie scoop - 4 scoops for each regular doughnut, and 1 for each mini doughnut.  The regular size doughnut pan is a lot easier to get the batter in to.  A frosting bag or a plastic bag with a corner cut off can also be used to get the batter in to the pans.  

As always, for oil I used Extra Light Olive Oil.   And a little secret, these are all dairy free......for the recipes that called for milk, I substituted rice milk and you can't even tell.  I am on a dairy free adventure, so I am excited that I can bake using rice milk.  The real test will be cake and I will try that very soon.  I don't think I changed much else for each of the recipes.  If you are new here, links to the recipes/sites are in the highlighted/underlined items.  Enjoy!


Chocolate Cake Doughnuts

French Breakfast Puffs - Doughnuts and Muffins

Pumpkin Mini Doughnuts


Monday, July 8, 2013

Applesauce Spice Bread

Not long ago I had the PA Grange Cookbook out and was making cole slaw.  Little C started flipping through the Grange Cookbook, reading out different recipe titles.  I heard "applesauce spice bread" and said "wait! go back to that one!"  Applesauce, cinnamon, nutmeg........I had to try it.   We made a trip to the store to buy applesauce and allspice.  I immediately went home and made a batch.  Delicious!   Super moist!  

I made the bread in 2 medium size loaf pans, but next time I will try it in my large stoneware loaf pan.  For this first one I made the topping, but it absorbs in to the top of the loaf and gets sticky after the first day.  It was kind of messy taking it in and out of the bag to slice each day.  Even with applesauce that did not have any added sugar, the bread was a little too sweet for me.  That is another reason I will leave the topping off next time.  The bread stayed pretty moist in the refrigerator until Little C had enjoyed it all - one slice at a time as part of breakfast.  The last day it was getting a little dry so we put some butter on it and it was good!

Here is the recipe, slightly adapted from the Pennsylvania Grange Cookbook.

Applesauce Spice Bread
1 1/4 cups applesauce (no sugar added)
1 cup sugar
1/2 cup extra light olive oil (or cooking oil)
2 eggs
3 Tablespoons milk
2 cups all purpose flour
1 teaspoon baking soda
1/2 teaspoon baking powder
1/2 teaspoon ground cinnamon
1/4 teaspoon nutmeg
1/4 teaspoon allspice
(1/4 teaspoon salt - if I used, it was 2 quick grinds of sea salt)
1/2 cup of walnuts (slightly chopped/mostly whole)

Topping (optional)
1/4 cup chopped walnuts
1/4 cup brown sugar
1/2 teaspoon cinnamon

Mix applesauce, sugar, oil, milk and eggs.  Sift all dry ingredients and stir in to applesauce mixture.  Beat well.  Fold in the walnuts.  Pour in to a well greased loaf pan.  Combine the topping ingredients and sprinkle over the batter.  Bake at 350 for 1 hour.  (I did not write it down, my I think my smaller loaves took over an hour)  Cool on a wire rack.  Enjoy!

Applesauce Spice Bread

Monday, May 20, 2013

9th Birthday Party - Candy Spoons, Party Favors, Water Bottles and Merci Notes

I debated on doing separate posts for the birthday party items, but decided to just put it all in one post.

Where to start.....The chocolate cake will show up in another post, but it was great and devoured!

The water bottles:  I took off the regular labels and replaced them with Paris paper.  They needed some extra strong adhesive at the seam.  I cut out pink circles and 9's, and black scallops and attached them to each bottle.  The plates had a white scallop, black circle and white circle; and I was going to copy this pattern, but I did not have the right circle punches and had already gone overboard.   They looked good   on the table.  When they ended up on the floor, the table and sticking to foreheads, I was glad I didn't go to any more effort! :)

The party favors:  I bought the zebra treat purses at Hobby Lobby and decorated them with a pink circle, black scallop, pink scallop and an Eiffel Tower bling.  The purses contained a string of pearls from Mardi Gras Outlet, a sticker that matched the plates, and candy spoons.  The pearls were very affordable and thankfully, I purchased them before Mardi Gras because currently they are out of stock.  The candy spoons were the main item for the favors.  I had first seen the idea on Sweetapolia's Blog, and I did a trial run a few months before the party.  I found black "formal" plastic spoons at Party City; they are a little bigger than a regular plastic spoon and the handles were more decorative.  I set the spoons on a jelly roll pan with the handles propped on the pan edges; this way the spoons were level.  I melted white chocolate and placed a small amount in each spoon.  I then sprinkled them with different kinds of pink sprinkles, pink disco dust, and silver stars.  After they were set up, I put each one in a cellophane bag and tied the bag with a pink and black Eiffel Tower ribbon.  Since I usually run out of ribbon, I had bought 2 rolls.  I could have used a third roll!  The ribbon was wide so it took more to make a nice bow. I managed to get enough to tie each bag, and have a piece left over for Little C to wear in her hair.

The party was at a dance studio.   The girls had an hour long hip hop class (to Toby Mac music), then ate lots pizza and chocolate cake.  Most of the candy spoons were eaten before they left the building. It was a lot of fun and I consider it a success!

And finally, the Thank You Notes.  I continued the Paris theme.  The Eiffel Tower paper is the same as I used for the invitations and water bottles.  The "merci" stamp is from Hobby Lobby.  I made flat cards and I gave Little C the white paper to write the notes on before it was attached to the back of the card.   So, now all that is left is putting the birthday scrapbook pages together.   It never ends! :)


Cake table with party favors and decorated water bottles.

Place Setting

Me with the party table

Party Favors

Party Favor Contents

Candy Spoons
Thank You Notes

Thank You Notes Front
Thank You Notes Back

Monday, May 13, 2013

Pink Paris Birthday Invitations

Finally, the Birthday Invites that I started way back in December!

It all started with the party plates that Little C picked out from BirthdayExpress.  (Picture at the bottom of post) Once those were selected, I entered the Pink Paris Obsession Zone!

I had an idea and had to do a couple test runs before I got the right look.  I knew I wanted to make the invitation information on a tag, and had to do a little looking before I found the right tag.  I ended up using the  Sizzix Bigz Die Tags #3.   The Eiffel Towers are from Spellbinders French Frills Dies - these took the most time, due to the detail on the design.  The background and tag paper are on BoBunny Blush Double Dot paper - polka dots up on the card and down on the tag.  The Eiffel Tower and tag pocket papers are from the Carta Bella Paris Girl collection.

I had to try several pinks to match the back paper to the Paris paper pink.  I stated out and stayed with a 6x6 card.  I played with tags a little too, alternating between pink and black.  The invitation information is on plain white cardstock and I had those pages printed at Kinkos.  I used pink baker's twine for the tags.  The invitations were mailed in vellum envelopes, with the design showing on the back of the envelope and the pretty pink showing on the address side.

I was so excited about how they turned out.  Little C loved them!  Soon to follow, I will have the post(s) on the matching water bottles, party treat bags, thank you notes, and the actual party.

Paris Birthday Party Invitations

Paris Party Invites with Invitation on the Tag

Paris Birthday Party Invites

Invitations in vellum envelope 

Party Plates, Napkins & Stickers from BirthdayExpress.com


Friday, May 10, 2013

Coconut Cupcakes

These Coconut Cupcakes had been on my list of things to make for about a month.  They are a Cuisine at Home recipe and are delicious!   I am sure I have seen the recipe before since it was in a 2005 issue, but it came out with an eRecipe email in March and really caught my eye!

The cupcakes have coconut and coconut milk in them; and the white chocolate cream cheese frosting is topped with coconut.   Click here for the recipe.

They would be really cute with some jelly beans for Easter.    Or maybe topped with a chocolate covered almond......

They need to be stored in the refrigerator due to the cream cheese, so they dry out if kept too long.  I ate one the next day as my post workout snack and it was super yummy!  Not the best choice, I know, but I figure the coconut has a little protein in it, so it wasn't all bad! ;)

Coconut Cupcakes

Sunday, March 24, 2013

Bunny Table Runner

This is the first thing I have made, based on a Pinterest idea.  I am so happy with how it turned out!

Click here to see where I got the idea from.

I wasn't crazy about cutting out my own stencil, so I kept looking for a bunny stamp or stencil to use.  I found this bunny stencil at Hobby Lobby and it worked great!  The runner, paint and yarn came from Michael's.  The runner I bought was about twice as long as I needed it to be, so I cut it and applied Fray Check to the cut end.

Like the original directions say, make sure you put paper bags under the areas that you are stenciling.  I also had to use quite a bit of Elmer's glue to glue the tails on.  I tried other adhesive, but this worked best.  For the tails, I wrapped the yarn around a meat fork as a dinner fork was too small.   After wrapping the yarn around about 60 times, you cut another piece of yarn to tie the opposite way, to make the puffs.  I tied this piece twice, to ensure it was tight.  The first two tails I made were a disaster - they came apart when I started cutting the loops.  But, after moving up to the bigger fork and doing a double tie at the end, it worked well.  I also changed scissors and used a pair with a fine point.  After several hours, I removed the bags and put waxed paper under each bunny, and let them dry over night.

This is my Easter craft for the year.  I have about 5 desserts I want to make, so I need to figure out which ones to make this week.  Either that or my small group will be eating Easter themed desserts for the next month!


Bunny Table Runner

Bunny Table Runner

Close-up of Bunny Table Runner

Wednesday, March 13, 2013

Whoopie Pies (Chocolate with Pink Vanilla Filling)

Finally, the whoopie pies based on the ones I grew up with!
These are also called Gobs, but I think whoopie pies sound so much better and more fun!

I made these for Little C's school Valentine's Party, so the vanilla filling is pink.  I have also made them with green mint filling.    I really prefer these over the ones I made last year, as they are not as rich, and the cakes are much more moist.

The filling is made with a flour paste which sounds unappealing at first, but is really nice.  The key is to keep mixing the filling so that it is fluffy and doesn't separate.  The second time I didn't mix it long enough and the filling wasn't as pretty.  The recipe even says to mix for 10 minutes, but I guess I overlooked that detail.  This last time, I put the mixer on med/high, set the timer for 10 minutes and walked away.  The filling looked good even before I added the pink.   

My recipe is based on one from the Pennsylvania Grange Cookbook.

Whoopie Pies
  • 1/2 cup unsalted butter (room temperature)
  • 1 cup sugar
  • 1/2 cup buttermilk
  • 1 teaspoon baking soda
  • 1 egg
  • 1 1/2 cups flour
  • 1/2 cocoa
  • 1/3 cup of coffee (liquid)
  • 1 teaspoon vanilla
Cream the butter and sugar in a mixing bowl.  Add the other ingredients and mix well.  Drop by teaspoonful (I used a small cookie scoop) on to a parchment lined baking sheet, and bake at 350 for 7 minutes.  Do not over bake!  Cool on the cookie sheet for a couple of minutes then place on a wax paper covered cooling rack.  Do not stack the cookies or they may stick together.  The batter is thick but, I only baked 8 at a time to prevent them from running together during baking.

Whoopie Pie Filling
  • 1/2 cup of milk
  • 2 Tablespoons flour
  • 1/2 cup unsalted butter
  • 1/2 cup sugar
  • 1 teaspoon vanilla (and/or flavoring of choice)
  • pinch of salt
Cook milk and flour, until a nice paste forms.  Stir well while cooking.  Cool the paste. (I find it's best to do this before I make the cookies)  Cream sugar and butter; add cold paste, vanilla and salt.  Beat about 10 minutes with an electric mixer.  Spread filling on one cookie, then place another on top.  

Makes 2+ dozen.
If you want to be extra generous with the filling, I recommend doubling the filling recipe.

They take a little extra time, but are so worth it!


Whoopie Pies

Saturday, February 16, 2013

A Cherry Vanilla Valentine

I love Valentine's Day!!!

This year I made Cherry Vanilla Cupcakes, based on this recipe from Sweetapolita.  There is just something about Cherry Vanilla Cake that sounds fun and delicious, and pink!  This must have been a popular cake some years back because several people remember having it as kids.  I asked my mom if my grandmother used to make one.  She said yes, and it was my mother's birthday cake every year!  So, there is a recipe somewhere we need to find!

I wanted to serve the cake to small group on Wednesday, and then have it for our Valentine's dinner on Thursday, so I made cupcakes rather than a layer cake.  I made buttercream frosting and used cherry juice in place of milk.   The picture of the inside of the cupcake is not a good one, but it shows the cherry pieces and gives an idea of how it looks.   The cake is amazing!!!!

The cake recipe made 40 cupcakes using a large scoop; I baked them for 20 minutes at 350.

I am done using regular red food coloring because the pink isn't near as pretty/vibrant as when I use the gel food coloring.  I didn't have a red gel coloring, so I used the regular red food coloring which was OK, but not the deep color I wanted.  So, I guess I will just have to make these again!  I am sure I won't get any complaints! ;)

Small group loved the cupcakes!  I sent a dozen to work with Mr. SBQ and got all kinds of rave reviews, which of course made my day!

We celebrated Valentine's Day at home, as a family.  For dinner we had Kielbasa Wild Rice Soup with Butternut Squash, Waldorf Salad, and the cupcakes.   I made our placemats for a simple table decoration.  It was fun and Little C loved it!  Tonight I get my Valentine's Date! :)


Cherry Vanilla Cupcakes

Cherry Vanilla Cupcakes

Cherry Vanilla Cupcake - inside

Valentine Table